The Ultimate Guide to Silicone Clean Up: Removing Sealant, Caulk & Residue
Silicone is a versatile material used in a wide range of applications, from sealing bathtubs and windows to crafting and DIY projects. However, dealing with silicone clean up can be a sticky and frustrating task. Whether you’re removing old sealant, cleaning up excess caulk, or dealing with stubborn silicone residue, this comprehensive guide provides practical tips and techniques to make the process easier and more effective. We’ll cover everything from identifying the right tools to using appropriate solvents and prevention methods to avoid future messes. Understanding how to properly handle silicone clean up is essential for achieving professional-looking results and maintaining the longevity of your surfaces.
Understanding Silicone and Why Clean Up is Necessary
Silicone is a synthetic polymer known for its flexibility, water resistance, and durability. These properties make it ideal for sealing gaps, preventing leaks, and protecting surfaces from moisture. However, these same characteristics can also make silicone clean up challenging. Unlike some other sealants and adhesives, silicone doesn’t easily dissolve or break down with standard cleaning agents. Over time, silicone can also attract dirt, mildew, and other contaminants, requiring regular cleaning to maintain its appearance and functionality. Neglecting silicone clean up can lead to unsightly stains, reduced adhesion, and even the growth of harmful mold and bacteria. Therefore, understanding the proper methods for removing and cleaning silicone is crucial.
Essential Tools and Materials for Silicone Clean Up
Before you begin any silicone clean up project, it’s important to gather the necessary tools and materials. Having the right equipment on hand will not only make the job easier but also minimize the risk of damaging the underlying surfaces. Here’s a list of essential items:
- Scraper: A plastic or metal scraper is essential for removing bulk silicone. Choose a scraper with a sharp edge for effective removal without scratching the surface.
- Utility Knife or Razor Blade: For precise cutting and trimming of silicone, a utility knife or razor blade is invaluable. Be careful when using these tools to avoid injury or damage to surrounding surfaces.
- Solvent: Various solvents can help dissolve and loosen silicone residue. Common options include mineral spirits, rubbing alcohol, acetone, and specialized silicone removers. Always test the solvent on an inconspicuous area first to ensure it doesn’t damage the surface.
- Cleaning Cloths or Rags: Soft, absorbent cloths are necessary for wiping away dissolved silicone and cleaning surfaces. Microfiber cloths are particularly effective at removing residue without leaving streaks.
- Spray Bottle: A spray bottle can be used to apply solvents evenly and control the amount of liquid used.
- Gloves: Protect your hands from chemicals and sharp tools by wearing gloves during the silicone clean up process.
- Safety Glasses: Protect your eyes from splashes and debris by wearing safety glasses.
- Ventilation: Ensure adequate ventilation in the work area to avoid inhaling harmful fumes from solvents. Open windows or use a fan to circulate air.
Step-by-Step Guide to Removing Silicone Sealant and Caulk
Removing old or unwanted silicone sealant and caulk requires a systematic approach. Follow these steps for effective silicone clean up:
Step 1: Softening the Silicone
Before attempting to remove silicone, soften it by applying heat or a solvent. A heat gun or hairdryer can be used to gently warm the silicone, making it more pliable. Alternatively, apply a solvent such as mineral spirits or a specialized silicone remover to the silicone and let it sit for several minutes to loosen its grip.
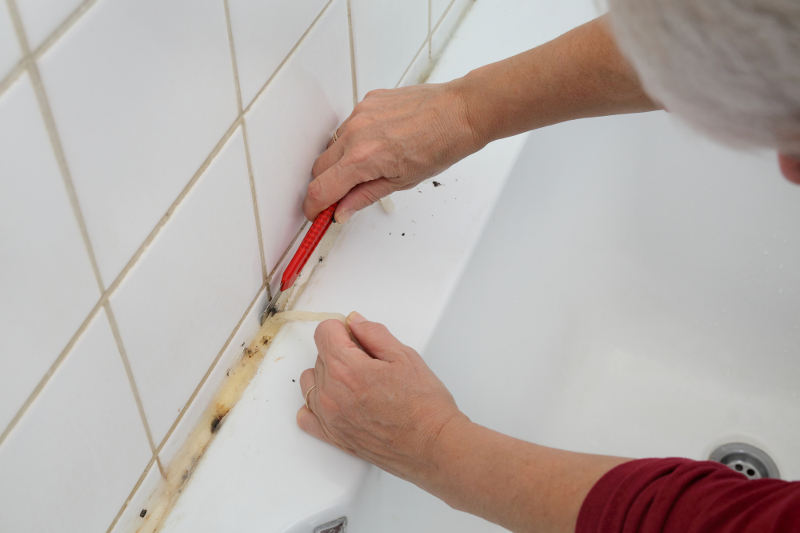
Step 2: Cutting the Silicone
Use a utility knife or razor blade to carefully cut along the edges of the silicone bead. This will help to separate the silicone from the surrounding surfaces and make it easier to remove. Be cautious not to damage the underlying material.
Step 3: Scraping Away the Silicone
Using a scraper, carefully pry up the silicone from the surface. Work slowly and methodically, applying gentle pressure to avoid scratching or damaging the material. If the silicone is particularly stubborn, reapply the solvent and allow it to soak for a longer period.
Step 4: Removing Residue
After removing the bulk of the silicone, you’ll likely be left with some residue. To remove this, apply a solvent to a clean cloth and wipe the affected area. For stubborn residue, use a scouring pad or abrasive cleaner, but be careful not to scratch the surface. Repeat as necessary until all residue is gone. Proper silicone clean up is important for the longevity of the surface.
Step 5: Cleaning and Preparing the Surface
Once the silicone is completely removed, clean the surface with a mild detergent and water. This will remove any remaining solvent or residue and prepare the surface for new sealant or caulk. Allow the surface to dry completely before applying any new materials. A clean surface is key to good adhesion.
Effective Solvents for Silicone Clean Up
Choosing the right solvent is crucial for effective silicone clean up. Here are some of the most commonly used solvents and their applications:
- Mineral Spirits: Mineral spirits are a versatile solvent that can dissolve and loosen silicone residue. They are relatively mild and safe for use on most surfaces, but it’s always a good idea to test them in an inconspicuous area first.
- Rubbing Alcohol: Rubbing alcohol (isopropyl alcohol) is another effective solvent for removing silicone residue. It’s particularly useful for cleaning up small spills and removing light residue.
- Acetone: Acetone is a strong solvent that can quickly dissolve silicone. However, it can also damage some surfaces, so it’s important to use it with caution and test it in an inconspicuous area first.
- Specialized Silicone Removers: Several commercially available silicone removers are specifically formulated to dissolve and remove silicone. These products are often more effective than general-purpose solvents and may be safer for use on delicate surfaces. Always follow the manufacturer’s instructions when using these products.
Tips for Preventing Silicone Messes
Prevention is always better than cure. Here are some tips to help you avoid silicone clean up in the first place:
- Use the Right Amount of Silicone: Avoid applying too much silicone, as this can lead to excess squeeze-out and messy clean up. Apply a thin, even bead of silicone and smooth it out with a wet finger or a sealant smoothing tool.
- Protect Surrounding Surfaces: Before applying silicone, protect surrounding surfaces with painter’s tape or masking tape. This will prevent silicone from getting on unwanted areas and make clean up much easier.
- Clean Up Spills Immediately: If you do spill silicone, clean it up immediately with a clean cloth and a solvent. The longer you wait, the harder it will be to remove.
- Use a Sealant Smoothing Tool: A sealant smoothing tool can help you create a smooth, even bead of silicone and minimize excess squeeze-out. These tools are inexpensive and can make a big difference in the final result.
- Choose the Right Type of Silicone: Different types of silicone are formulated for different applications. Make sure you choose the right type of silicone for your project to ensure proper adhesion and prevent leaks.
Dealing with Silicone on Different Surfaces
The approach to silicone clean up can vary depending on the type of surface you’re working with. Here are some tips for dealing with silicone on different materials:
Glass and Tile
Glass and tile are relatively easy to clean, but it’s important to avoid scratching the surface. Use a plastic scraper and a mild solvent to remove silicone residue. For stubborn residue, use a glass cleaner or a specialized tile cleaner.
Plastic
Some solvents can damage plastic, so it’s important to choose a mild solvent such as rubbing alcohol or mineral spirits. Test the solvent in an inconspicuous area first to ensure it doesn’t damage the plastic. Use a soft cloth to wipe away the residue.
Metal
Metal is generally resistant to solvents, but it’s still important to avoid using abrasive cleaners that can scratch the surface. Use a plastic scraper and a solvent to remove silicone residue. For stubborn residue, use a metal polish or a specialized metal cleaner.
Wood
Wood is porous and can absorb solvents, so it’s important to use a mild solvent and work quickly. Apply the solvent to a clean cloth and wipe the affected area. Avoid letting the solvent soak into the wood. For stubborn residue, use a wood cleaner or a specialized wood stripper. [See also: How to Remove Caulk from Wood]
Safety Precautions for Silicone Clean Up
Silicone clean up can involve the use of chemicals and sharp tools, so it’s important to take appropriate safety precautions. Here are some tips to keep you safe:
- Wear Gloves: Protect your hands from chemicals and sharp tools by wearing gloves.
- Wear Safety Glasses: Protect your eyes from splashes and debris by wearing safety glasses.
- Ensure Adequate Ventilation: Ensure adequate ventilation in the work area to avoid inhaling harmful fumes from solvents.
- Read and Follow Product Instructions: Always read and follow the manufacturer’s instructions when using solvents or other cleaning products.
- Dispose of Waste Properly: Dispose of used cloths, solvents, and silicone residue in accordance with local regulations.
Common Mistakes to Avoid During Silicone Clean Up
Even with the best intentions, it’s easy to make mistakes during silicone clean up. Here are some common mistakes to avoid:
- Using the Wrong Solvent: Using the wrong solvent can damage the surface or make the problem worse. Always test the solvent in an inconspicuous area first.
- Applying Too Much Pressure: Applying too much pressure when scraping or scrubbing can scratch the surface. Work slowly and gently, and let the solvent do the work.
- Neglecting Safety Precautions: Neglecting safety precautions can lead to injury or illness. Always wear gloves and safety glasses, and ensure adequate ventilation.
- Not Cleaning the Surface Properly: Not cleaning the surface properly before applying new sealant or caulk can lead to poor adhesion and leaks. Always clean the surface thoroughly with a mild detergent and water.
The Importance of Professional Silicone Clean Up Services
While many silicone clean up tasks can be handled DIY, some situations may require the expertise of professional cleaning services. These situations include:
- Large-Scale Projects: For large-scale projects, such as removing silicone from an entire bathroom or kitchen, professional services can save you time and effort.
- Delicate Surfaces: If you’re working with delicate surfaces that could be easily damaged, professional cleaners have the tools and expertise to remove silicone safely.
- Difficult-to-Reach Areas: If the silicone is in a difficult-to-reach area, such as high ceilings or tight corners, professional cleaners have the equipment and experience to access it.
- Hazardous Materials: If the silicone contains hazardous materials, such as asbestos, professional cleaners have the training and equipment to handle it safely.
Proper silicone clean up is essential for maintaining the appearance and functionality of your surfaces. By following the tips and techniques outlined in this guide, you can effectively remove silicone sealant, caulk, and residue without damaging the underlying materials. Whether you’re a DIY enthusiast or a professional contractor, understanding how to handle silicone clean up is a valuable skill. Remember to always prioritize safety, choose the right tools and solvents, and take your time to achieve the best results. Regular maintenance and prompt clean up will help prevent future messes and keep your surfaces looking their best. [See also: Best Silicone Sealants for Bathrooms]
