How to Take Pedals Off a Bike: A Comprehensive Guide
Learning how to take pedals off a bike is a fundamental skill for any cyclist, from casual riders to seasoned professionals. Whether you’re replacing worn-out pedals, upgrading to a new set, or simply performing routine maintenance, knowing the proper technique can save you time, money, and potential frustration. This guide provides a step-by-step approach to safely and effectively removing bike pedals, ensuring you can keep your ride in top condition. Understanding how to take pedals off a bike also helps with bike transportation and storage, making it easier to pack your bike for travel or fit it into tight spaces.
Understanding Pedal Threads and Directions
Before diving into the removal process, it’s crucial to understand the threading of bike pedals. Unlike most screws and bolts, bike pedals have different threading directions on each side. This design prevents them from loosening while you’re pedaling. The right pedal (the one on the drive side, where the chain and gears are) has a standard right-hand thread, meaning you turn it counter-clockwise to loosen it. The left pedal has a left-hand thread, so you turn it clockwise to loosen it. Remembering this difference is essential to avoid damaging the pedal or crank arm.
Why Different Threads?
The reverse threading on the left pedal is a safety feature. As you pedal forward, the natural tendency would be to tighten a standard right-hand threaded pedal. Over time, this could make the pedal extremely difficult to remove. By using a left-hand thread on the left pedal, the pedaling motion actually helps to keep the pedal tightened, rather than loosened.
Tools You’ll Need
To successfully take pedals off a bike, you’ll need the following tools:
- Pedal Wrench: A pedal wrench is specifically designed for removing bike pedals. It’s typically 15mm and longer than a standard wrench, providing extra leverage.
- Allen Wrench (Hex Key): Some pedals have an Allen wrench fitting on the inside of the crank arm. Check your pedals to see if you need an Allen wrench instead of a pedal wrench. Common sizes are 6mm or 8mm.
- Grease: Applying grease to the pedal threads before reinstallation is crucial to prevent them from seizing up over time.
- Gloves (Optional): Wearing gloves can protect your hands and provide a better grip.
- Rag: A rag is useful for cleaning the pedals and crank arms.
Step-by-Step Guide: How to Take Pedals Off a Bike
Follow these steps to safely and effectively remove your bike pedals:
- Prepare Your Bike: Position your bike so that you can comfortably work on the pedals. You can place it in a bike stand or lean it against a wall. Make sure the bike is stable.
- Identify the Pedal Threads: Remember that the right pedal loosens counter-clockwise, and the left pedal loosens clockwise.
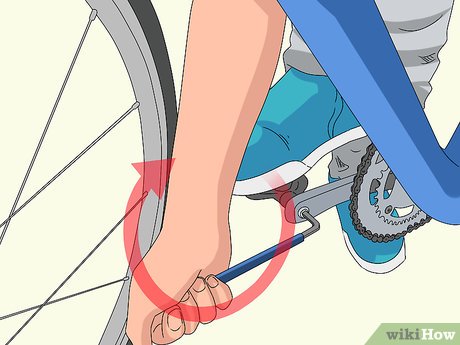
- Position the Wrench: Place the pedal wrench or Allen wrench onto the pedal axle. Make sure the wrench is fully engaged and secure to prevent slipping.
- Apply Leverage: Apply firm and steady pressure to the wrench. If the pedal is stuck, you may need to use more force. A longer wrench provides better leverage. Be careful not to round off the edges of the pedal axle.
- Loosen the Pedal: Once the pedal starts to loosen, continue turning the wrench until you can remove the pedal by hand.
- Repeat for the Other Pedal: Repeat the process for the other pedal, remembering to turn the wrench in the opposite direction.
- Clean the Threads: Use a rag to clean the threads on both the pedals and the crank arms. Remove any dirt, grime, or old grease.
Troubleshooting Common Issues
Sometimes, removing bike pedals can be challenging. Here are some common issues and how to address them:
Stuck Pedals
If the pedals are stuck, try the following:
- Apply Penetrating Oil: Spray penetrating oil onto the pedal threads and let it sit for a few minutes. This can help to loosen the corrosion and make it easier to remove the pedals.
- Use a Longer Wrench: A longer wrench provides more leverage, making it easier to break the pedal free.
- Heat the Crank Arm: Applying heat to the crank arm with a heat gun or hair dryer can help to expand the metal and loosen the pedal. Be careful not to overheat the crank arm.
- Tap the Wrench: Gently tap the wrench with a hammer to help break the pedal free.
Stripped Pedal Axle
If the pedal axle is stripped, it can be very difficult to remove the pedal. In this case, you may need to take the bike to a professional mechanic. They may be able to use specialized tools to remove the pedal without damaging the crank arm.
Damaged Crank Arm Threads
If the threads in the crank arm are damaged, you may need to have the crank arm re-tapped or replaced. This is a more complex repair that is best left to a professional.
Installing New Pedals
Once you’ve successfully removed the old pedals, you can install new ones. Here’s how:
- Apply Grease: Apply a thin layer of grease to the pedal threads. This will prevent the pedals from seizing up in the future and make them easier to remove next time.
- Identify the Left and Right Pedals: Most pedals are marked with an “L” for left and an “R” for right. Make sure you install the correct pedal on the correct side.
- Thread the Pedal by Hand: Start threading the pedal into the crank arm by hand. Make sure the threads are aligned properly to avoid cross-threading.
- Tighten the Pedal: Use the pedal wrench or Allen wrench to tighten the pedal. Tighten it securely, but don’t overtighten it.
- Repeat for the Other Pedal: Repeat the process for the other pedal.
Maintenance Tips
To keep your pedals in good condition and prevent them from seizing up, follow these maintenance tips:
- Grease the Threads Regularly: Apply grease to the pedal threads every few months, especially if you ride in wet or muddy conditions.
- Check Pedal Tightness: Check the tightness of the pedals regularly. Loose pedals can damage the crank arm threads.
- Clean Your Pedals: Clean your pedals regularly to remove dirt and grime.
- Replace Worn Pedals: Replace worn pedals as needed. Worn pedals can be dangerous and can also damage the crank arms.
Choosing the Right Pedals
Selecting the right pedals for your bike depends on your riding style and preferences. There are several types of pedals available, including:
- Platform Pedals: These are the most common type of pedals and are suitable for casual riding.
- Clipless Pedals: These pedals require special shoes that clip into the pedal. They provide a more efficient transfer of power and are popular among serious cyclists.
- Hybrid Pedals: These pedals have a platform on one side and a clipless mechanism on the other. They offer the versatility of both types of pedals.
Conclusion
Knowing how to take pedals off a bike is a valuable skill for any cyclist. By following the steps outlined in this guide, you can safely and effectively remove and install bike pedals, keeping your bike in top condition. Remember to always use the correct tools, apply grease to the threads, and be mindful of the different threading directions. Regular maintenance and proper pedal selection will ensure a smooth and enjoyable riding experience. This detailed explanation on how to take pedals off a bike should equip you with the knowledge and confidence to tackle this task yourself, saving you time and money in the long run. Properly removing and installing your bike pedals enhances your overall cycling experience, ensuring both safety and optimal performance. Understanding how to take pedals off a bike and maintain them is an essential part of bike ownership.
[See also: Bike Maintenance Essentials] [See also: Choosing the Right Bike Pedals] [See also: How to Clean Your Bike Chain]
