How to Remove Rust from Car Undercarriage: A Comprehensive Guide
Rust is a relentless enemy of automobiles, and the undercarriage, being constantly exposed to the elements, is particularly vulnerable. Learning how to remove rust from car undercarriage is crucial for maintaining the structural integrity and longevity of your vehicle. This guide provides a detailed, step-by-step approach to effectively combat rust and protect your car from further damage.
Understanding the Threat: Why Rust Removal is Essential
The undercarriage of your car faces a constant barrage of road salt, water, dirt, and debris. This harsh environment accelerates the oxidation process, leading to rust formation. Neglecting rust can lead to serious problems, including:
- Weakened structural components: Rust can compromise the strength of the frame, suspension, and other critical parts.
- Reduced vehicle safety: Damaged components can affect handling and braking, increasing the risk of accidents.
- Costly repairs: Extensive rust damage can require expensive repairs or even render the vehicle irreparable.
- Decreased resale value: A rusty undercarriage significantly lowers the value of your car.
Therefore, understanding how to remove rust from car undercarriage is an investment in your vehicle’s future.
Gathering Your Arsenal: Tools and Materials Needed
Before you embark on your rust removal mission, ensure you have the necessary tools and materials. This will streamline the process and ensure optimal results.
- Safety Gear: Eye protection (safety glasses or goggles), gloves (chemical-resistant), and a dust mask or respirator.
- Cleaning Supplies: Car wash soap, degreaser, and a pressure washer (optional but highly recommended).
- Rust Removal Tools: Wire brushes (various sizes and shapes), sandpaper (various grits), a rust converter or remover, and a scraper.
- Protective Coating: Rust-inhibiting primer, undercoating spray or paint, and application brushes or spray gun.
- Lifting Equipment: A car jack and jack stands to safely lift the vehicle.
- Optional Tools: A power drill with wire brush attachments, a vacuum cleaner, and masking tape.
Step-by-Step Guide: How to Remove Rust from Car Undercarriage
Follow these steps carefully to effectively remove rust from car undercarriage and protect your vehicle.
Step 1: Preparation and Safety
Park your car on a level surface and engage the parking brake. Put on your safety glasses, gloves, and dust mask. Use the car jack to lift the vehicle and securely support it with jack stands. Never work under a car supported only by a jack. Disconnect the negative terminal of the battery to prevent any electrical accidents.
Step 2: Cleaning the Undercarriage
Thoroughly clean the undercarriage to remove dirt, grime, and loose debris. Start by rinsing the area with a pressure washer or garden hose. Apply car wash soap and scrub with a brush to remove surface dirt. Use a degreaser to tackle any oily or greasy areas. Rinse thoroughly and allow the undercarriage to dry completely.
Step 3: Identifying and Assessing Rust Damage
Carefully inspect the undercarriage for rust. Identify areas with surface rust, moderate rust, and severe rust. Use a scraper or screwdriver to gently probe rusted areas to determine the extent of the damage. Note the location and severity of each rust spot.
Step 4: Removing Loose Rust
Use a wire brush or sandpaper to remove loose rust flakes and debris. For larger areas, a power drill with a wire brush attachment can be used. Apply moderate pressure and work in a back-and-forth motion. Be careful not to damage the underlying metal. Vacuum up any loose rust particles to prevent them from spreading.
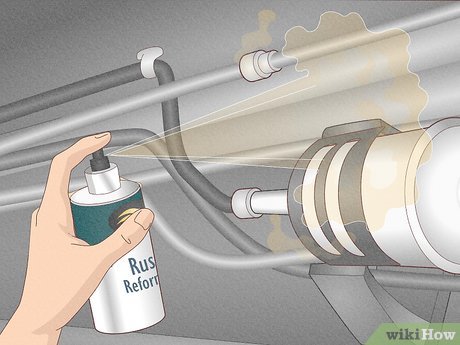
Step 5: Applying Rust Converter or Remover
Apply a rust converter or remover to the affected areas. Follow the manufacturer’s instructions carefully. Rust converters chemically react with the rust, converting it into a stable, paintable surface. Rust removers dissolve the rust, leaving a clean metal surface. Allow the product to dwell for the recommended time, then rinse or wipe clean as instructed.
Step 6: Sanding and Smoothing
Once the rust converter or remover has dried, sand the treated areas with progressively finer grits of sandpaper. This will smooth out the surface and prepare it for priming and painting. Start with a coarser grit (e.g., 120 grit) and gradually move to a finer grit (e.g., 320 grit). Feather the edges of the sanded areas to create a smooth transition.
Step 7: Priming and Painting
Apply a rust-inhibiting primer to the sanded areas. This will provide a protective barrier against future rust formation. Allow the primer to dry completely according to the manufacturer’s instructions. Apply multiple thin coats for best results. Once the primer is dry, apply an undercoating spray or paint to the undercarriage. This will provide an additional layer of protection against moisture, salt, and debris. Again, apply multiple thin coats for optimal coverage. [See also: Best Car Undercoating Options]
Step 8: Reassembly and Final Inspection
Carefully lower the car from the jack stands. Reconnect the negative terminal of the battery. Inspect the undercarriage to ensure that all rusted areas have been properly treated and protected. Touch up any areas as needed. Clean up your work area and dispose of any waste materials properly.
Preventative Measures: Keeping Rust at Bay
Once you’ve successfully remove rust from car undercarriage, it’s important to take preventative measures to minimize future rust formation.
- Regular Washing: Wash your car regularly, especially during the winter months when road salt is prevalent. Pay particular attention to the undercarriage.
- Undercoating: Consider applying a professional undercoating to your car. This will provide a durable, long-lasting barrier against rust.
- Rust Inhibitors: Apply rust inhibitors to vulnerable areas, such as seams and joints.
- Address Chips and Scratches: Repair any chips or scratches in the paint immediately to prevent rust from forming underneath.
- Garage Parking: If possible, park your car in a garage to protect it from the elements.
Choosing the Right Products: A Buyer’s Guide
Selecting the right products is crucial for effective rust removal and prevention. Consider the following factors when choosing rust converters, removers, primers, and undercoating sprays:
- Effectiveness: Read reviews and compare product specifications to ensure that the product is effective at removing or converting rust.
- Durability: Choose products that provide long-lasting protection against rust.
- Ease of Use: Select products that are easy to apply and require minimal preparation.
- Safety: Always read and follow the manufacturer’s safety instructions. Wear appropriate safety gear when handling chemicals.
- Cost: Compare prices and choose products that offer the best value for your money.
Professional Help: When to Call in the Experts
While how to remove rust from car undercarriage can be a DIY project, there are situations where it’s best to seek professional help. If the rust damage is extensive, or if you’re not comfortable working on your car’s undercarriage, consult a qualified mechanic or auto body shop. They have the expertise and equipment to safely and effectively remove rust and repair any structural damage. [See also: Finding a Reputable Auto Body Shop]
Conclusion: Protecting Your Investment
Rust is a serious threat to your car’s longevity and safety. By understanding how to remove rust from car undercarriage and taking preventative measures, you can protect your investment and keep your vehicle running smoothly for years to come. Remember to prioritize safety, use the right tools and materials, and follow the steps outlined in this guide carefully. With a little effort, you can keep rust at bay and enjoy a rust-free ride.
