Cap Shingles: Understanding Their Purpose, Installation, and Longevity
When it comes to roofing, every component plays a crucial role in ensuring the overall integrity and weather resistance of the structure. Among these components, cap shingles often go unnoticed, yet they are indispensable for providing the finishing touch and ultimate protection to your roof’s ridge and hip lines. This article delves into the purpose, installation process, longevity, and common issues associated with cap shingles, providing a comprehensive understanding of this essential roofing element.
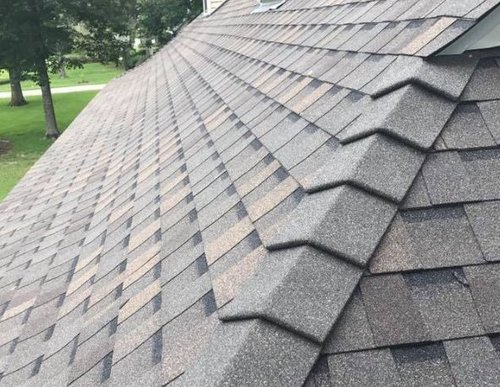
What are Cap Shingles?
Cap shingles, also known as ridge cap shingles or hip cap shingles, are specifically designed to cover the ridge and hip lines of a roof. These areas are particularly vulnerable to water infiltration and wind damage because they represent the intersection of two roof planes. Cap shingles provide an extra layer of protection to these critical areas, ensuring a watertight seal and enhancing the roof’s overall durability. They are typically made from the same material as the field shingles used on the main body of the roof, ensuring a consistent aesthetic.
The primary function of cap shingles is to shield the roof’s ridge and hip from the elements. They act as a barrier against rain, snow, and wind, preventing water from seeping into the underlayment and eventually causing leaks inside the building. By effectively sealing these vulnerable areas, cap shingles help extend the lifespan of the roof and protect the underlying structure from moisture damage, which can lead to rot, mold growth, and structural weakening. Furthermore, properly installed cap shingles enhance the aesthetic appeal of the roof by providing a clean and finished look to the ridge and hip lines.
Materials Used in Cap Shingles
Cap shingles are commonly made from asphalt, but other materials such as metal, tile, and composite materials can also be used depending on the overall roofing system. Asphalt cap shingles are the most popular choice due to their affordability, ease of installation, and wide availability. They are typically made from the same asphalt composition as the field shingles, ensuring a consistent look and performance across the entire roof. Metal cap shingles offer superior durability and longevity, making them a good option for high-end roofing systems. Tile cap shingles are often used in conjunction with tile roofing systems to maintain a cohesive aesthetic and provide the necessary protection to the ridge and hip lines. Composite cap shingles are made from a blend of recycled materials and offer a sustainable and durable alternative to traditional asphalt shingles.
Installation Process of Cap Shingles
The installation of cap shingles is a critical step in ensuring the long-term performance and weather resistance of the roof. It is typically performed after the field shingles have been installed on the main body of the roof. The process involves carefully cutting the cap shingles to the appropriate size and shape, then securing them to the ridge or hip line using roofing nails or staples. Proper overlap and alignment are essential to create a watertight seal and prevent water from seeping underneath the shingles. Here’s a general overview of the installation process:
- Preparation: Ensure the roof surface is clean, dry, and free of debris. Gather all necessary tools and materials, including cap shingles, roofing nails, a hammer or nail gun, a utility knife, and a measuring tape.
- Cutting the Shingles: Measure the length of the ridge or hip line and cut the cap shingles to the appropriate size. The size and shape of the cap shingles will depend on the specific product and the angle of the roof.
- Applying the First Shingle: Start at one end of the ridge or hip line and apply the first cap shingle. Ensure that it is aligned properly and overlaps the field shingles by the recommended amount. Secure the shingle with roofing nails, placing them in the designated nailing area.
- Overlapping and Securing: Continue applying the cap shingles, overlapping each shingle by the recommended amount. This overlap is crucial for creating a watertight seal. Secure each shingle with roofing nails, ensuring that they are driven in straight and flush with the shingle surface.
- Finishing Touches: Once all the cap shingles have been installed, inspect the ridge or hip line to ensure that all shingles are properly aligned and secured. Trim any excess material and apply roofing sealant to any exposed nail heads or edges to further enhance the weather resistance.
It’s highly recommended to hire a professional roofing contractor for cap shingles installation to ensure it’s done correctly and efficiently. A professional roofer has the expertise, experience, and tools to properly install cap shingles, minimizing the risk of leaks and other issues. They can also provide valuable advice on the best type of cap shingles for your specific roofing system and climate.
Common Issues with Cap Shingles
Despite their durability, cap shingles can experience problems over time due to exposure to the elements, improper installation, or material defects. Common issues include:
- Cracking and Curling: Exposure to extreme temperatures and UV radiation can cause cap shingles to crack, curl, or become brittle. This can compromise their ability to seal the roof and lead to leaks.
- Missing Shingles: High winds can sometimes dislodge cap shingles, leaving the ridge or hip line exposed to the elements. This is more likely to occur with older or poorly installed shingles.
- Granule Loss: Asphalt cap shingles are coated with granules that protect the asphalt from UV radiation and provide added durability. Over time, these granules can wear away, leaving the asphalt exposed and vulnerable to damage.
- Improper Installation: Incorrect installation techniques, such as improper overlap or insufficient nailing, can lead to leaks and premature failure of the cap shingles.
Maintaining and Extending the Life of Cap Shingles
Proper maintenance and timely repairs can significantly extend the lifespan of cap shingles and prevent costly damage to the roof. Regular inspections should be conducted to identify any signs of damage, such as cracking, curling, or missing shingles. Any damaged or missing cap shingles should be replaced promptly to prevent water infiltration. Cleaning the roof regularly to remove debris, moss, and algae can also help prolong the life of the cap shingles. Consider applying a roof coating or sealant to provide an extra layer of protection against the elements.
Cost Considerations for Cap Shingles
The cost of cap shingles can vary depending on the material, style, and brand. Asphalt cap shingles are typically the most affordable option, while metal, tile, and composite cap shingles tend to be more expensive. The cost of installation will also depend on the complexity of the roof and the labor rates in your area. It’s advisable to get quotes from several roofing contractors to compare prices and services. While it may be tempting to cut costs by DIYing the installation, it’s generally best to hire a professional to ensure that the job is done correctly and to avoid potential safety hazards. Factors affecting the overall cost can include the type of material chosen, the roof’s complexity, and regional labor costs. Investing in quality cap shingles and professional installation can save you money in the long run by preventing costly repairs and extending the life of your roof.
Choosing the Right Cap Shingles
Selecting the appropriate cap shingles for your roof involves considering several factors. Matching the material and color to your existing field shingles is crucial for a cohesive look. Furthermore, it is essential to factor in your local climate. For example, areas with heavy snowfall might require more robust, impact-resistant cap shingles. Evaluate the roof’s slope and design, as steeper roofs may benefit from shingles with enhanced wind resistance. Consulting with a roofing professional can provide valuable insights tailored to your specific needs and budget. They can guide you through the various options and help you make an informed decision that ensures the longevity and performance of your roof.
The Importance of Ventilation
While cap shingles provide a crucial barrier against water intrusion, proper roof ventilation is equally important for maintaining a healthy and long-lasting roof. Adequate ventilation helps regulate the temperature and humidity levels in the attic, preventing moisture buildup that can damage the roof structure and lead to mold growth. A well-ventilated roof also helps prevent ice dams in cold climates and reduces the risk of overheating in hot climates. Ensure that your roof has adequate intake and exhaust vents to promote proper airflow. Regularly inspect the vents to ensure that they are not blocked by debris or insulation. Proper ventilation works in tandem with cap shingles to ensure a dry, durable, and energy-efficient roof.
Conclusion
Cap shingles are a vital component of any roofing system, providing essential protection to the roof’s ridge and hip lines. Understanding their purpose, installation process, and potential issues can help homeowners make informed decisions about their roofing needs. Regular maintenance and timely repairs can significantly extend the life of cap shingles and prevent costly damage to the roof. When it comes to roofing, every detail matters, and cap shingles are no exception. By ensuring that your cap shingles are properly installed and maintained, you can protect your home from the elements and enjoy a durable, long-lasting roof for years to come. Investing in quality cap shingles is an investment in the overall health and longevity of your home.
[See also: Asphalt Shingle Roofing: A Comprehensive Guide]
[See also: Understanding Roof Underlayment: Types and Installation]
