
How to Remove Tar from Car Paint: A Comprehensive Guide
Tar on your car’s paint isn’t just unsightly; it can also cause long-term damage if left untreated. This sticky substance, a byproduct of asphalt and road construction, adheres stubbornly to your vehicle and can be a real pain to remove tar car paint effectively. But don’t despair! This comprehensive guide will walk you through everything you need to know about safely and efficiently removing tar car paint, protecting your investment and keeping your car looking its best. We’ll cover everything from identifying tar spots to choosing the right cleaning products and techniques.
Understanding the Enemy: What is Tar and Why is it Harmful?
Tar is a thick, dark, and sticky material composed primarily of hydrocarbons. It’s created during the distillation of coal, wood, or petroleum. When you’re driving, especially on newly paved roads or during road construction, your car is susceptible to picking up tar splatters. These splatters, if not promptly addressed, can harden and bond with the car’s clear coat, leading to:
- Discoloration: Tar can stain the paint, leaving behind a dull or yellowed appearance.
- Corrosion: Over time, tar can break down the clear coat, exposing the paint underneath to the elements and increasing the risk of rust and corrosion.
- Reduced Resale Value: A car with unsightly tar spots is simply less appealing to potential buyers.
Identifying Tar Spots on Your Car
Tar spots are usually easy to identify. They appear as small, black or dark brown spots or streaks on the lower panels of your car, especially around the wheel wells and bumpers. They often feel rough to the touch compared to the smooth surface of the surrounding paint. Early identification is crucial, as fresh tar is much easier to remove tar car paint compared to hardened, baked-on deposits.
Essential Tools and Products for Removing Tar
Before you begin the remove tar car paint process, gather the necessary tools and products. Using the right materials will make the job easier and minimize the risk of damage to your car’s finish. Here’s what you’ll need:
- Tar Remover: Choose a dedicated tar remover specifically designed for automotive use. These products contain solvents that break down the tar, making it easier to wipe away. Look for reputable brands and read reviews before making your purchase.
- Microfiber Towels: Invest in high-quality microfiber towels. These are soft, absorbent, and won’t scratch your car’s paint. Have several on hand, as you’ll need clean towels to wipe away the tar remover and polish the surface.
- Wash Mitt: A soft wash mitt is essential for pre-washing your car to remove loose dirt and debris.
- Two Buckets: Use one bucket for soapy water and the other for rinsing your wash mitt. This helps prevent dirt from being reintroduced to the car’s surface.
- Car Wash Soap: Choose a pH-neutral car wash soap that is safe for your car’s paint.
- Clay Bar (Optional): For stubborn tar deposits, a clay bar can be used to gently lift the remaining residue.
- Detailing Spray (Optional): Detailing spray can help lubricate the clay bar and provide extra protection for the paint.
- Wax or Sealant (Optional): After removing the tar, apply a coat of wax or sealant to protect the paint and prevent future tar buildup.
Step-by-Step Guide to Removing Tar from Car Paint
Now that you have your tools and products ready, let’s get to the remove tar car paint process. Follow these steps carefully to achieve the best results:
Step 1: Wash Your Car
Before applying any tar remover, thoroughly wash your car to remove loose dirt, grime, and debris. This will prevent you from grinding dirt into the paint while you’re trying to remove the tar. Use the two-bucket method, washing from top to bottom, and rinse thoroughly.
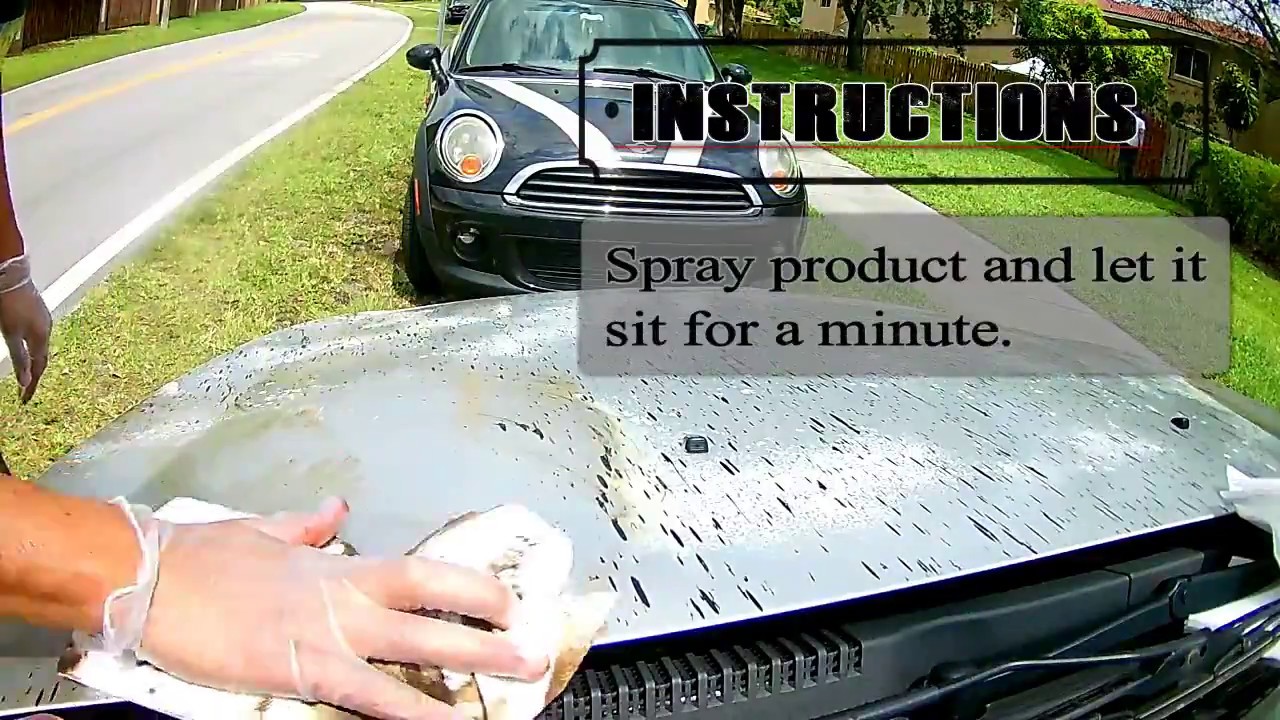
Step 2: Apply Tar Remover
Spray the tar remover directly onto the tar spots, following the manufacturer’s instructions. Allow the product to dwell for the recommended amount of time. This will give the solvents time to break down the tar. Avoid applying tar remover to large areas of the car, as it can potentially damage the clear coat if left on for too long. Always test the product on an inconspicuous area first to ensure it doesn’t cause any discoloration or damage.
Step 3: Gently Wipe Away the Tar
Using a clean microfiber towel, gently wipe away the softened tar. Avoid scrubbing aggressively, as this can scratch the paint. If the tar is particularly stubborn, you may need to reapply the tar remover and allow it to dwell for a longer period. Use a fresh section of the microfiber towel for each wipe to avoid transferring the tar back onto the paint.
Step 4: Clay Bar Treatment (If Necessary)
If some tar residue remains after using the tar remover, you can use a clay bar to gently lift the remaining deposits. Spray the area with detailing spray to lubricate the surface, and then gently glide the clay bar back and forth over the affected area. Knead the clay bar frequently to expose a clean surface. Once you’ve removed the residue, wipe the area clean with a microfiber towel.
Step 5: Wash and Dry the Area
After removing the tar, wash the area again with car wash soap and water to remove any remaining tar remover or detailing spray. Rinse thoroughly and dry with a clean microfiber towel.
Step 6: Apply Wax or Sealant
To protect the paint and prevent future tar buildup, apply a coat of wax or sealant to the affected area. This will create a barrier between the paint and the elements, making it easier to remove tar car paint in the future. Follow the manufacturer’s instructions for applying the wax or sealant.
Choosing the Right Tar Remover: Key Considerations
With so many tar removers on the market, choosing the right one can be overwhelming. Here are some key considerations to keep in mind:
- Paint Compatibility: Ensure the tar remover is specifically designed for automotive paint and is safe for use on your car’s finish.
- Solvent Strength: Consider the strength of the solvents in the tar remover. Stronger solvents may be more effective at removing stubborn tar, but they can also be more likely to damage the paint.
- Application Method: Some tar removers come in spray bottles, while others are applied with a cloth. Choose an application method that you find convenient and easy to use.
- User Reviews: Read online reviews from other users to get an idea of the product’s effectiveness and safety.
Preventing Tar Buildup: Tips and Tricks
Prevention is always better than cure. Here are some tips to help prevent tar buildup on your car:
- Avoid Driving on Newly Paved Roads: If possible, avoid driving on newly paved roads or during road construction.
- Wash Your Car Regularly: Regular washing will help remove tar before it has a chance to harden and bond with the paint.
- Apply Wax or Sealant: A coat of wax or sealant will provide a protective barrier against tar and other contaminants.
- Consider Paint Protection Film (PPF): For ultimate protection, consider applying paint protection film (PPF) to vulnerable areas of your car, such as the lower panels and bumpers.
Common Mistakes to Avoid When Removing Tar
While the remove tar car paint process is relatively straightforward, there are some common mistakes to avoid:
- Using Abrasive Cleaners: Avoid using abrasive cleaners or scouring pads, as these can scratch the paint.
- Scrubbing Too Hard: Scrubbing too hard can also damage the paint. Be gentle and let the tar remover do the work.
- Leaving Tar Remover on Too Long: Leaving tar remover on the paint for too long can damage the clear coat. Follow the manufacturer’s instructions carefully.
- Working in Direct Sunlight: Avoid working in direct sunlight, as this can cause the tar remover to dry too quickly.
When to Seek Professional Help
If you’re unsure about removing tar car paint yourself, or if the tar deposits are particularly stubborn, it’s best to seek professional help from a detailing shop. Professional detailers have the experience and equipment to safely and effectively remove tar without damaging your car’s paint.
Conclusion: Keeping Your Car Tar-Free
Removing tar car paint doesn’t have to be a daunting task. By following the steps outlined in this guide, using the right tools and products, and taking preventative measures, you can keep your car looking its best and protect its value. Remember to always test products in an inconspicuous area first, and don’t hesitate to seek professional help if needed. With a little effort, you can maintain a tar-free, showroom-worthy finish for years to come. [See also: Car Detailing Tips for Beginners], [See also: Best Car Waxes for Protection], [See also: How to Wash Your Car Like a Pro]
