
The Ultimate Guide to Cleaning Disc Brakes: Performance, Safety, and Longevity
Disc brakes are a crucial component of any bicycle, providing reliable stopping power in various conditions. However, their performance can be significantly impacted by dirt, grime, and contaminants. Regular cleaning disc brakes is essential not only for maintaining optimal braking performance but also for ensuring your safety and extending the lifespan of your brake components. This comprehensive guide will walk you through everything you need to know about cleaning disc brakes effectively.
Why Cleaning Disc Brakes Matters
Before diving into the how-to, let’s understand why cleaning disc brakes is so important. Over time, brake pads generate dust as they wear down. This dust, along with road grime, oil, and other debris, can accumulate on the brake rotors and pads. This contamination reduces friction, leading to:
- Reduced braking power
- Squealing or noisy brakes
- Uneven brake pad wear
- Increased risk of brake fade
Ignoring these issues can compromise your safety and necessitate premature replacement of brake pads and rotors. Regular cleaning disc brakes addresses these problems and keeps your braking system functioning at its best. Think of it like changing the oil in your car; it’s preventative maintenance that pays dividends in the long run.
Tools and Materials Needed for Cleaning Disc Brakes
To effectively cleaning disc brakes, you’ll need the following:
- Disc Brake Cleaner: Specifically formulated for brake systems, it removes contaminants without damaging rubber seals or paint. Avoid using general degreasers or solvents, as these can harm your brakes.
- Clean Rags or Microfiber Cloths: Use these to wipe down the rotors and calipers. Avoid using shop towels that might leave lint behind.
- Isopropyl Alcohol (Optional): Can be used as a supplement to brake cleaner, but ensure it’s at least 90% pure.
- Gloves: Protect your hands from brake cleaner and contaminants.
- Brake Pad Spreader (Optional): Helpful for creating space between the pads for better cleaning access.
- Small Brush (Optional): For scrubbing particularly stubborn grime. An old toothbrush works well.
Step-by-Step Guide to Cleaning Disc Brakes
Preparation
Before you start, ensure your bike is safely secured in a repair stand or leaning against a stable surface. Remove the wheels to gain better access to the brake components. This makes the cleaning disc brakes process much easier and more thorough.
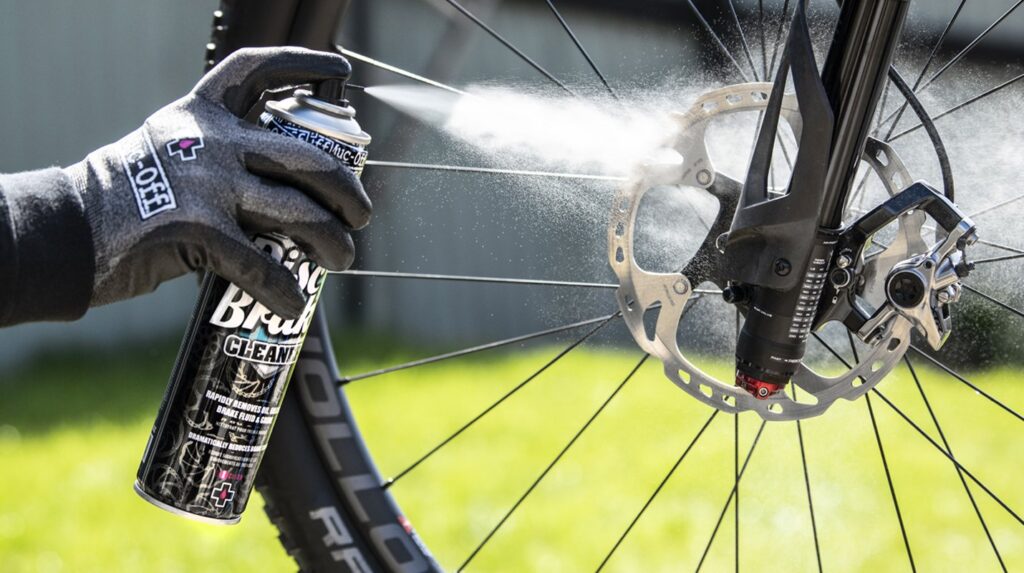
Cleaning the Rotors
- Apply Brake Cleaner: Generously spray disc brake cleaner onto both sides of the rotor. Make sure to saturate the entire surface.
- Wipe Clean: Using a clean rag or microfiber cloth, thoroughly wipe down the rotor, removing any visible dirt, grime, or brake dust.
- Repeat if Necessary: If the rotor is heavily contaminated, repeat steps 1 and 2 until the rag comes away clean.
- Inspect the Rotor: Check for any signs of damage, such as cracks or excessive wear. If you notice any issues, consult a professional mechanic.
Cleaning the Calipers and Brake Pads
The calipers and brake pads also accumulate grime and should be cleaned regularly. Remember to be cautious when handling brake pads, as they may contain asbestos (especially older models). Wear gloves and avoid breathing in the dust.
- Apply Brake Cleaner: Spray brake cleaner onto the calipers, focusing on the areas around the pistons and brake pads.
- Wipe Clean: Use a clean rag or small brush to remove dirt and grime from the calipers. Pay attention to the piston area.
- Clean the Brake Pads: Spray brake cleaner directly onto the brake pads. If they are heavily contaminated, consider removing them for a more thorough cleaning. Gently scrub the surface of the pads with a brush.
- Allow to Dry: Let the brake cleaner evaporate completely before reassembling the wheels. This usually takes a few minutes.
Reassembly and Testing
Once the components are clean and dry, reassemble the wheels and ensure the brake calipers are properly aligned. Spin the wheels to check for any rubbing or noise. Pump the brake levers several times to re-engage the brake pads and ensure proper function. A final test ride is recommended to confirm that your brakes are performing optimally. Remember, cleaning disc brakes is only part of the maintenance process; regular inspection and pad replacement are also crucial.
Troubleshooting Common Issues
Squealing Brakes After Cleaning
If your brakes are still squealing after cleaning disc brakes, it could be due to several reasons:
- Contamination: Ensure you’ve thoroughly removed all contaminants from the rotors and pads. Sometimes, a small amount of oil or grease can cause persistent squealing.
- Glazed Brake Pads: Over time, brake pads can become glazed, reducing their friction. You can try sanding the surface of the pads with fine-grit sandpaper to remove the glaze.
- Misalignment: Check that the brake calipers are properly aligned with the rotors. Misalignment can cause uneven pad wear and noise.
- Worn Brake Pads: If your brake pads are excessively worn, they may need to be replaced.
Reduced Braking Power After Cleaning
If you experience reduced braking power after cleaning disc brakes, it could be due to:
- Insufficient Bedding-In: After cleaning or replacing brake pads, they need to be bedded-in to achieve optimal performance. This involves performing a series of controlled stops to transfer material from the pads to the rotors.
- Contamination: As with squealing brakes, contamination can reduce braking power. Double-check that the rotors and pads are clean.
- Air in the Brake Lines: Air in the brake lines can reduce hydraulic pressure, leading to weak braking. Bleeding the brakes may be necessary. [See also: How to Bleed Your Bike Brakes]
Preventative Measures
To minimize the need for frequent cleaning disc brakes, consider these preventative measures:
- Avoid riding through mud and puddles: These can introduce contaminants to your brake system.
- Store your bike properly: Keep your bike in a clean, dry place to prevent rust and corrosion.
- Regularly inspect your brakes: Check for signs of wear or damage and address any issues promptly.
- Use high-quality brake pads: Quality brake pads tend to produce less dust and provide better performance.
Choosing the Right Brake Cleaner
Selecting the right brake cleaner is crucial for effective cleaning disc brakes without causing damage. Look for products that are specifically formulated for bicycle disc brakes and that are safe for rubber seals and painted surfaces. Avoid using harsh solvents or degreasers, as these can damage your brake components. Read the product label carefully and follow the manufacturer’s instructions.
When to Seek Professional Help
While cleaning disc brakes is a relatively straightforward task, there are situations where it’s best to seek professional help:
- If you’re unsure about any step of the process.
- If you suspect there’s a more serious issue with your brakes, such as a hydraulic leak.
- If you’ve tried cleaning your brakes and they’re still not performing properly.
A qualified mechanic can diagnose and repair any brake problems, ensuring your safety on the road or trail.
The Importance of Regular Maintenance
In conclusion, cleaning disc brakes is a vital aspect of bicycle maintenance that should not be overlooked. Regular cleaning not only enhances braking performance and safety but also extends the lifespan of your brake components. By following the steps outlined in this guide and incorporating preventative measures, you can keep your disc brakes in top condition and enjoy a smoother, safer riding experience. Don’t wait until your brakes start squealing or losing power; make cleaning disc brakes a regular part of your bike maintenance routine. [See also: Bike Maintenance Checklist] Regular maintenance, including cleaning disc brakes, will contribute significantly to the longevity and reliability of your bicycle. Remember to always prioritize safety and consult a professional if you are unsure about any aspect of brake maintenance. Cleaning disc brakes is a small investment of time that yields significant returns in terms of performance and safety. Making it a habit will keep you riding smoothly and confidently. The process of cleaning disc brakes is straightforward, but its impact on your bike’s overall performance is substantial. So, grab your tools, follow these steps, and enjoy the benefits of well-maintained disc brakes! Proper cleaning disc brakes improves not only stopping power but also responsiveness. A clean brake system reacts faster and more predictably, giving you better control. And finally, remember that cleaning disc brakes contributes to a better riding experience overall. Knowing your brakes are in top condition provides peace of mind and allows you to focus on enjoying the ride.
