
How to Clean Auto Electrical Connectors: A Comprehensive Guide
Maintaining the integrity of your vehicle’s electrical system is crucial for its overall performance and reliability. A key component of this system is the myriad of electrical connectors that link various sensors, modules, and components together. Over time, these connectors can become corroded, dirty, or damaged, leading to a range of electrical problems. Knowing how to clean auto electrical connectors effectively can save you time, money, and frustration. This guide provides a comprehensive overview of the process, covering everything from identifying potential issues to the best practices for cleaning and maintaining these vital connections. We’ll explore the tools you’ll need, the steps involved, and some preventative measures to keep your electrical system running smoothly.
Why Clean Auto Electrical Connectors?
Before diving into the cleaning process, it’s essential to understand why it’s necessary. Auto electrical connectors are exposed to a harsh environment, including moisture, dirt, road salt, and extreme temperatures. These elements can lead to corrosion, which increases resistance in the circuit. This increased resistance can cause a variety of problems, such as:
- Intermittent failures: Electrical components may work sporadically, making diagnosis difficult.
- Reduced performance: Sensors may provide inaccurate readings, leading to poor engine performance or other system malfunctions.
- Complete system failure: In severe cases, corroded connectors can completely interrupt the electrical circuit, causing a component to stop working entirely.
- Increased risk of fire: High resistance can generate heat, potentially leading to a fire hazard.
Regularly cleaning your auto electrical connectors can prevent these issues and ensure your vehicle’s electrical system operates reliably. It’s a simple maintenance task that can save you from costly repairs down the line. Identifying potential connection problems early is key; look for signs of corrosion, loose connections, or damaged wiring insulation.
Tools and Materials Needed
To effectively clean auto electrical connectors, you’ll need the right tools and materials. Here’s a checklist:
- Electrical Contact Cleaner: This specialized cleaner is designed to dissolve corrosion and contaminants without damaging the connector’s plastic housing or metal contacts. Do *not* use WD-40 or similar products, as they can attract dirt and grime over time.
- Small Brushes: A set of small brushes, such as acid brushes or toothbrushes, can help scrub away stubborn corrosion.
- Connector Pick Set: These small, pointed tools are useful for dislodging debris and cleaning hard-to-reach areas.
- Dielectric Grease: Applying dielectric grease after cleaning helps protect the connector from moisture and corrosion.
- Lint-Free Cloths or Rags: These are essential for wiping away cleaner and debris.
- Safety Glasses: Protect your eyes from cleaner and debris.
- Gloves: Protect your hands from chemicals and dirt.
- Multimeter (Optional): A multimeter can be used to test the continuity of the circuit before and after cleaning to ensure the connection is restored.
- Compressed Air (Optional): Compressed air can help remove loose debris and dry the connector after cleaning.
Step-by-Step Guide to Cleaning Auto Electrical Connectors
Follow these steps to properly clean your auto electrical connectors:
Step 1: Disconnect the Power
Before you start, disconnect the negative terminal of your car battery. This will prevent any accidental short circuits while you’re working on the electrical system. Safety first!
Step 2: Locate and Identify the Connector
Identify the connector you want to clean. Refer to your vehicle’s service manual or wiring diagram if you’re unsure of its location or function. Take a picture of the connector before disconnecting it; this will help you remember how it goes back together.
Step 3: Disconnect the Connector
Carefully disconnect the connector. Most connectors have a locking mechanism that needs to be released before you can pull them apart. Avoid pulling on the wires, as this can damage them or the connector itself. Use a small screwdriver or connector pick to gently release the locking tab.
Step 4: Inspect the Connector
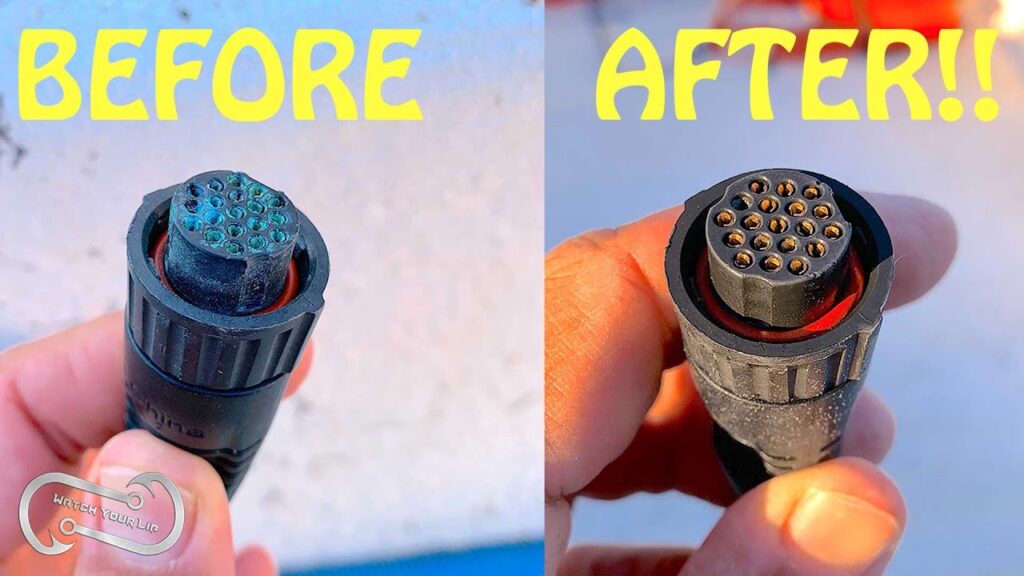
Once the connector is disconnected, inspect it for signs of corrosion, dirt, or damage. Look for green or white powdery deposits on the metal contacts, as this is a sign of corrosion. Also, check the connector housing for cracks or other damage.
Step 5: Apply Electrical Contact Cleaner
Spray the electrical contact cleaner liberally onto the connector’s metal contacts. Make sure to saturate the entire area, including the inside of the connector housing. Let the cleaner sit for a few minutes to dissolve the corrosion.
Step 6: Scrub the Contacts
Use a small brush or connector pick to scrub away any remaining corrosion or debris. Be gentle, as you don’t want to damage the metal contacts. Pay close attention to the areas where corrosion is most prevalent.
Step 7: Clean the Connector Housing
Use a lint-free cloth or rag to wipe away any excess cleaner and debris from the connector housing. Make sure the housing is clean and dry before reassembling the connector.
Step 8: Reassemble the Connector
Carefully reassemble the connector, making sure the locking mechanism is fully engaged. Ensure the connector is securely fastened and that the wires are not strained or damaged.
Step 9: Apply Dielectric Grease
Apply a small amount of dielectric grease to the connector’s metal contacts. This will help protect the connector from moisture and corrosion and ensure a good electrical connection. A little goes a long way; don’t overdo it.
Step 10: Reconnect the Power
Reconnect the negative terminal of your car battery. Start your engine and test the electrical component that you cleaned the connector for. If the problem persists, you may need to further diagnose the issue or replace the connector.
Preventative Measures
While cleaning auto electrical connectors is an effective way to address electrical problems, taking preventative measures can help reduce the need for frequent cleaning. Here are some tips:
- Use Dielectric Grease: As mentioned earlier, applying dielectric grease to connectors helps protect them from moisture and corrosion. Apply it whenever you disconnect and reconnect an electrical connector.
- Protect Connectors from the Elements: If possible, shield connectors from direct exposure to water, dirt, and road salt. Use protective covers or wraps to keep them clean and dry.
- Regular Inspections: Periodically inspect your vehicle’s electrical connectors for signs of corrosion or damage. Catching problems early can prevent them from escalating.
- Proper Wiring Practices: Ensure that all wiring is properly secured and protected. Avoid running wires in areas where they can be exposed to excessive heat, vibration, or abrasion.
- Use Quality Connectors: When replacing connectors, use high-quality parts that are designed to withstand the rigors of the automotive environment.
Troubleshooting Common Issues
Even after cleaning auto electrical connectors, you may still encounter electrical problems. Here are some common issues and how to troubleshoot them:
- Intermittent Connections: If the electrical component works sporadically, the connector may still be corroded or damaged. Re-clean the connector and check for any loose wires or damaged contacts.
- Open Circuits: If the electrical component doesn’t work at all, the circuit may be open. Use a multimeter to test the continuity of the circuit and identify any breaks or shorts.
- Short Circuits: If the electrical component blows a fuse or causes other electrical problems, there may be a short circuit. Inspect the wiring for any damaged insulation or exposed wires.
- Connector Damage: If the connector housing is cracked or broken, it may need to be replaced. Replace the connector with a new one that is designed for your vehicle.
When to Seek Professional Help
While cleaning auto electrical connectors is a relatively simple task, some electrical problems may require professional help. If you’re not comfortable working on your vehicle’s electrical system, or if you’ve tried cleaning the connectors and the problem persists, it’s best to consult a qualified mechanic. They have the expertise and equipment to diagnose and repair complex electrical issues. Also, if you suspect there’s a more serious electrical issue, such as a short circuit or a faulty control module, seek professional help immediately.
Conclusion
Knowing how to clean auto electrical connectors is a valuable skill for any car owner. By following the steps outlined in this guide, you can keep your vehicle’s electrical system running smoothly and prevent costly repairs. Remember to use the right tools and materials, take preventative measures, and seek professional help when needed. Maintaining your auto electrical connectors is a small investment that can pay off in the long run, ensuring your vehicle’s reliability and performance for years to come. Regular maintenance, including cleaning and protecting these vital connections, is a key part of keeping your car on the road and avoiding unexpected breakdowns. Don’t underestimate the importance of clean, well-maintained connectors!
[See also: How to Test a Car Battery with a Multimeter]
[See also: Understanding Automotive Wiring Diagrams]
[See also: Common Car Electrical Problems and Solutions]
