
Mastering Cassette Removal: A Comprehensive Guide to Rear Wheel Maintenance
Maintaining your bicycle’s drivetrain is crucial for optimal performance and longevity. A key component of this maintenance involves the cassette, the cluster of sprockets on your rear wheel that provides the gears you need for various terrains. Knowing how to perform a cassette removal from the rear wheel is an essential skill for any cyclist, whether you’re replacing worn-out components, upgrading your gear range, or simply cleaning and servicing your bike. This comprehensive guide will walk you through the process step-by-step, providing you with the knowledge and confidence to tackle this task yourself.
Why Remove Your Cassette?
There are several reasons why you might need to remove a cassette from your rear wheel:
- Replacement: Cassettes, like chains and chainrings, wear down over time. Replacing a worn cassette ensures smooth shifting and prevents premature wear on other drivetrain components.
- Cleaning: Over time, grease, dirt, and grime accumulate on the cassette, affecting shifting performance. Removing the cassette allows for thorough cleaning.
- Upgrading: You might want to upgrade to a cassette with a different gear range to better suit your riding style or the terrain you typically ride on.
- Wheel Maintenance: Sometimes, removing the cassette is necessary to access the hub for maintenance or repair.
Tools You’ll Need
Before you begin the cassette removal process from your rear wheel, gather the necessary tools:
- Cassette Lockring Tool: This specialized tool engages with the lockring that secures the cassette to the freehub body. Make sure you have the correct type for your cassette (Shimano/SRAM or Campagnolo).
- Chain Whip: This tool holds the cassette in place while you loosen the lockring.
- Adjustable Wrench or Socket Wrench: To turn the cassette lockring tool.
- Gloves: To protect your hands.
- Cleaning Supplies: Degreaser, brushes, and rags for cleaning the cassette after removal.
Step-by-Step Guide to Cassette Removal
Follow these steps carefully to safely and effectively remove your cassette from the rear wheel:
Step 1: Secure the Wheel
Begin by removing the rear wheel from your bike. Make sure the bike is stable and secure, either in a repair stand or resting safely on the ground. This will prevent accidents during the cassette removal process.
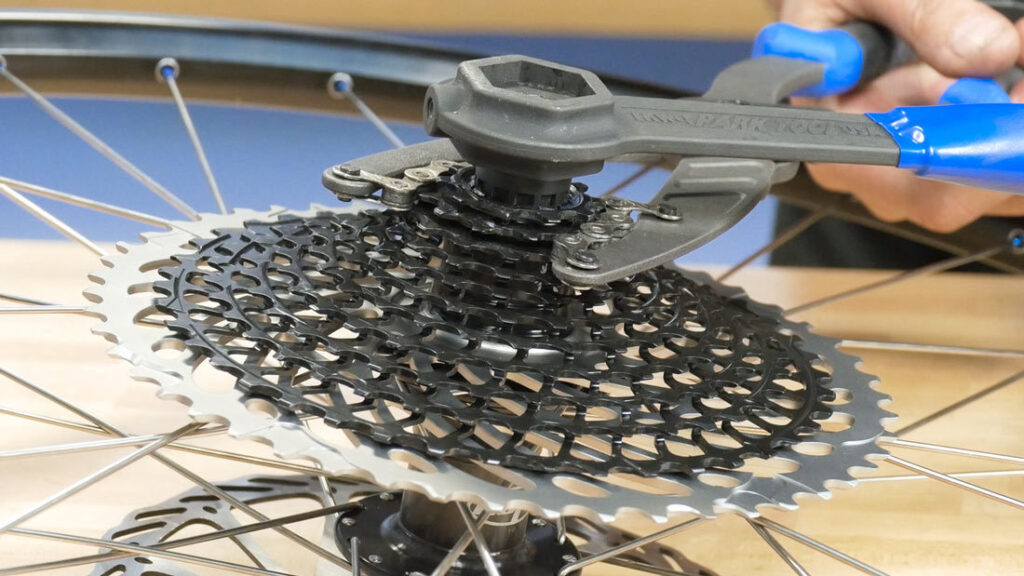
Step 2: Insert the Cassette Lockring Tool
Insert the cassette lockring tool into the lockring on the smallest cog of the cassette. Ensure the tool is fully engaged and seated properly. It should fit snugly and securely. Misalignment can damage the lockring.
Step 3: Engage the Chain Whip
Wrap the chain whip around one of the larger cogs of the cassette. The chain whip prevents the cassette from freewheeling while you loosen the lockring. Hold the chain whip firmly, ensuring it doesn’t slip.
Step 4: Loosen the Lockring
Using an adjustable wrench or socket wrench, turn the cassette lockring tool counterclockwise while holding the chain whip firmly in place. You’ll need to apply significant force to loosen the lockring, as it’s typically tightened to a high torque. Be patient and apply steady pressure. A long-handled wrench can provide additional leverage.
Step 5: Remove the Lockring
Once the lockring is loosened, you can remove the cassette lockring tool and the chain whip. Unscrew the lockring completely by hand. Be careful not to lose any of the small parts, such as the lockring itself or any spacers that might be present.
Step 6: Slide the Cassette Off
With the lockring removed, you can now slide the cassette cogs off the freehub body. Note the order and orientation of the cogs and any spacers between them. This will be helpful when reinstalling the cassette later. Some cassettes have individual cogs, while others are grouped together on a carrier. Pay attention to how they are arranged.
Cleaning and Inspection
Now that the cassette is removed from the rear wheel, take the opportunity to clean and inspect the components:
- Cassette Cogs: Use a degreaser and a brush to thoroughly clean each cog. Remove any accumulated dirt, grease, and grime.
- Freehub Body: Inspect the freehub body for any signs of damage or wear. Clean it with a rag and a degreaser. Check the pawls (small ratcheting mechanisms) to ensure they are moving freely and engaging properly. If the pawls are sticky or not engaging, you may need to lubricate them with a light oil.
- Lockring: Clean the lockring and inspect it for any damage to the threads.
Reinstalling the Cassette
Reinstalling the cassette is essentially the reverse of the removal process:
Step 1: Lubricate the Freehub Body
Apply a thin layer of grease to the splines of the freehub body. This will help prevent the cassette cogs from seizing onto the freehub and make future removal easier.
Step 2: Slide the Cogs Back On
Slide the cassette cogs back onto the freehub body in the correct order and orientation, referring to the notes you made during removal. Ensure that any spacers are also in the correct positions. The cogs should slide on smoothly. If they don’t, double-check that you have the correct order and orientation.
Step 3: Install the Lockring
Thread the lockring onto the freehub body by hand, turning it clockwise. Make sure it’s properly aligned and that the threads are engaging smoothly.
Step 4: Tighten the Lockring
Insert the cassette lockring tool into the lockring and tighten it to the manufacturer’s recommended torque specification, using an adjustable wrench or socket wrench. The torque specification is usually printed on the lockring itself or in the bike’s owner’s manual. Over-tightening can damage the lockring or the freehub body, while under-tightening can cause the cassette to come loose during riding. Use a torque wrench to ensure accurate tightening.
Step 5: Reinstall the Wheel
Reinstall the rear wheel onto your bike. Make sure it’s properly seated in the dropouts and that the quick-release lever or thru-axle is securely tightened.
Troubleshooting
Here are some common issues you might encounter during cassette removal and how to address them:
- Lockring Won’t Budge: If the lockring is extremely tight, try applying penetrating oil to the threads and let it sit for a few minutes before attempting to loosen it again. Using a longer wrench for more leverage can also help.
- Chain Whip Slipping: Make sure you have a good grip on the chain whip and that it’s properly engaged with the cassette cogs. If the chain whip is worn or damaged, it may need to be replaced.
- Damaged Lockring: If the lockring is damaged or stripped, you’ll need to replace it. Be careful not to damage the freehub body when removing a damaged lockring.
- Freehub Body Issues: If the freehub body is damaged or worn, it may need to be replaced. This is a more complex repair that may require specialized tools and knowledge.
Conclusion
Knowing how to perform a cassette removal from your rear wheel is a valuable skill for any cyclist. By following this comprehensive guide and taking the necessary precautions, you can confidently maintain your drivetrain and ensure smooth, reliable shifting. Regular cleaning and maintenance will extend the life of your cassette and other drivetrain components, saving you money and keeping you riding smoothly. Remember to always use the correct tools and torque specifications to avoid damaging your bike. Happy riding!
[See also: Bicycle Drivetrain Maintenance Tips]
[See also: Choosing the Right Cassette for Your Riding Style]
[See also: How to Clean Your Bike Chain]
