How to Remove Old Car Stickers: A Comprehensive Guide
Car stickers, from parking permits to political statements, often find a long-term home on our vehicles. But what happens when you want to remove them? Whether you’re selling your car, updating its look, or simply tired of a particular sticker, knowing how to remove old car stickers effectively is crucial. This guide provides a comprehensive, step-by-step approach to safely and efficiently removing even the most stubborn decals without damaging your car’s paint.
Understanding the Challenge of Removing Car Stickers
Removing old car stickers isn’t always a straightforward process. Over time, the adhesive bonds tightly to the surface, and the sticker material itself can become brittle and prone to tearing. Factors like sun exposure and weather conditions can further complicate the removal, making it essential to approach the task with the right tools and techniques.
Essential Tools and Materials
Before you begin, gather the necessary tools and materials. Having everything on hand will streamline the process and prevent unnecessary delays. Here’s a list of essential items:
- Heat Gun or Hair Dryer: Heat softens the adhesive, making it easier to peel away the sticker.
- Plastic Razor Blade or Scraper: A plastic blade minimizes the risk of scratching your car’s paint. Avoid using metal blades unless you are highly experienced.
- Adhesive Remover: Products like Goo Gone, WD-40, or specialized automotive adhesive removers are effective in dissolving stubborn residue.
- Microfiber Cloths: These are essential for cleaning the surface and applying adhesive remover.
- Warm, Soapy Water: For initial cleaning and final wipe-down.
- Isopropyl Alcohol (Optional): For removing any remaining stubborn residue.
- Gloves: To protect your hands from chemicals and heat.
Step-by-Step Guide to Removing Car Stickers
Follow these steps carefully to ensure a successful and damage-free sticker removal:
Preparation is Key
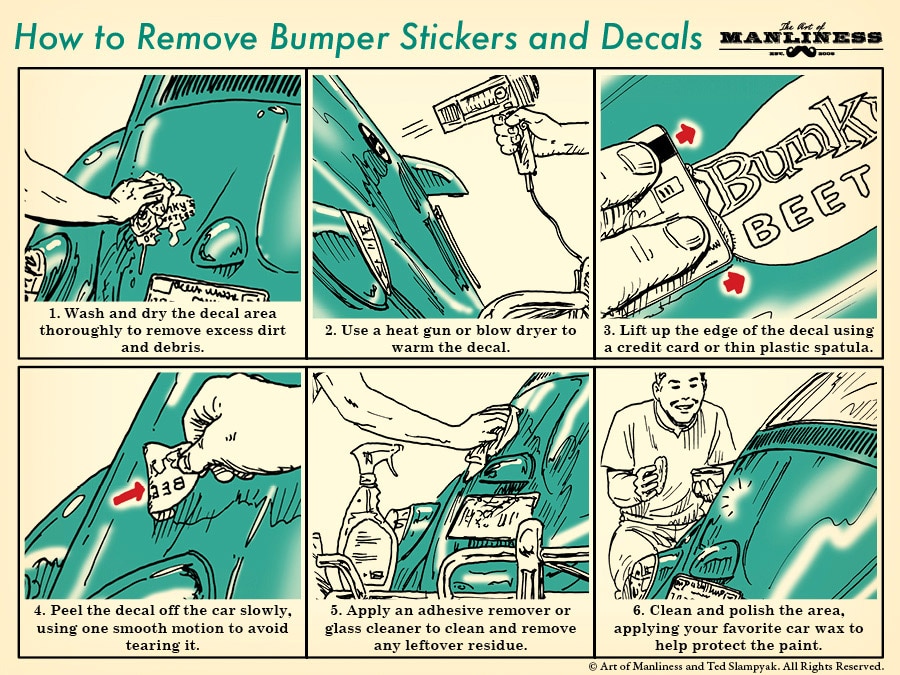
Start by washing the area around the sticker with warm, soapy water. This removes dirt and grime that could scratch the paint during the removal process. Dry the area thoroughly with a microfiber cloth.
Applying Heat
Using a heat gun or hair dryer, gently heat the sticker for a few minutes. Keep the heat source moving and avoid concentrating on one spot for too long, as this could damage the paint. The goal is to soften the adhesive without overheating the surface. You’ll notice that the edges of the sticker will start to lift slightly as the adhesive loosens.
Peeling the Sticker
Once the sticker is warm, use a plastic razor blade or scraper to carefully lift an edge. Begin peeling the sticker slowly and steadily, applying heat as needed to keep the adhesive soft. If the sticker tears, reapply heat and continue peeling from a different angle. Avoid pulling the sticker too quickly, as this can leave behind more adhesive residue.
Removing Adhesive Residue
After removing the sticker, you’ll likely be left with some adhesive residue. Apply a generous amount of adhesive remover to the affected area. Let it sit for a few minutes to dissolve the residue. Use a microfiber cloth to gently wipe away the adhesive. You may need to repeat this process several times for stubborn residue. For particularly difficult spots, try using isopropyl alcohol after the adhesive remover.
Final Cleaning and Polishing
Once all the adhesive residue is removed, clean the area again with warm, soapy water to remove any remaining chemicals. Dry the area thoroughly with a clean microfiber cloth. For added protection and shine, consider applying a coat of wax or polish to the area.
Tips for Removing Specific Types of Car Stickers
The removal process may vary slightly depending on the type of sticker you’re dealing with:
Parking Permits
Parking permits often use a strong adhesive to prevent tampering. Applying heat is particularly important for these stickers. Be patient and work slowly to avoid tearing the sticker into small pieces.
Bumper Stickers
Bumper stickers are often exposed to harsh weather conditions, making them more difficult to remove. Use plenty of adhesive remover and allow it to soak into the residue before wiping it away.
Vinyl Decals
Vinyl decals tend to be more pliable and easier to remove than paper stickers. However, they can still leave behind adhesive residue. Use a plastic razor blade to lift the edges and peel them away slowly.
Window Stickers
Window stickers are generally easier to remove than stickers applied to painted surfaces. You can use a glass cleaner or a solution of vinegar and water to help loosen the adhesive. A razor blade (carefully) can also be used on glass. However, be extremely cautious when using any blade on tinted windows, as you could damage the tint film.
Common Mistakes to Avoid
Avoiding these common mistakes can prevent damage to your car’s paint and ensure a smoother removal process:
- Using Metal Blades on Painted Surfaces: Metal blades can easily scratch the paint. Always use a plastic razor blade or scraper.
- Applying Too Much Heat: Overheating the paint can cause it to blister or fade. Keep the heat source moving and avoid concentrating on one spot for too long.
- Using Harsh Chemicals: Avoid using harsh chemicals like acetone or lacquer thinner, as they can damage the paint. Stick to adhesive removers specifically designed for automotive use.
- Rushing the Process: Patience is key. Rushing the removal process can lead to tearing the sticker and leaving behind more adhesive residue.
Alternative Methods for Removing Car Stickers
While the heat and adhesive remover method is generally the most effective, there are a few alternative methods you can try:
- Vinegar and Water Solution: Mix equal parts vinegar and water in a spray bottle. Spray the solution onto the sticker and let it sit for a few minutes before attempting to peel it off.
- Baking Soda Paste: Mix baking soda with water to form a paste. Apply the paste to the sticker and let it sit for 15-20 minutes before wiping it away.
- Peanut Butter: Surprisingly, the oils in peanut butter can help dissolve adhesive residue. Apply a thin layer of peanut butter to the residue and let it sit for a few minutes before wiping it away.
Preventing Future Sticker Problems
To avoid future headaches, consider these tips for preventing sticker problems:
- Apply Stickers to Easily Removable Surfaces: If possible, apply stickers to windows or other surfaces that are easier to clean.
- Use Removable Stickers: Opt for stickers that are specifically designed to be easily removed without leaving residue.
- Protect Stickers from the Elements: Applying a clear coat of sealant to stickers can help protect them from sun and weather damage, making them easier to remove later.
Conclusion
Knowing how to remove old car stickers effectively is a valuable skill for any car owner. By following these steps and using the right tools, you can safely and efficiently remove even the most stubborn decals without damaging your car’s paint. Remember to be patient, work slowly, and avoid common mistakes to achieve the best results. With a little effort, you can restore your car’s appearance and keep it looking its best. Removing those old car stickers doesn’t have to be a dreaded task. Following these guidelines provides a clear path for success in how to remove old car stickers. Also, remember safety first. Protecting your car’s finish while removing old car stickers is paramount. The key is understanding how to remove old car stickers without causing damage. So, take your time, follow the steps, and enjoy a sticker-free ride. Successfully learning how to remove old car stickers will save you time and money in the long run. The ability to properly remove old car stickers is a useful skill for any car owner. Proper technique on how to remove old car stickers prevents damage and ensures a clean finish. Don’t underestimate the importance of knowing how to remove old car stickers the right way. Finally, mastering how to remove old car stickers contributes to the overall maintenance and appearance of your vehicle.
[See also: How to Detail Your Car Like a Pro]
[See also: Best Car Cleaning Products for a Showroom Shine]
[See also: Automotive Paint Protection: Everything You Need to Know]
